Showing posts with label hanging lights. Show all posts

Wednesday, December 14, 2011

Winterlicious Glass Bubbles

Volleyball got canceled this morning so I'm catching up on some blogging time.  It rained all day here yesterday so I finished up some projects and caught up on my taped shows.   
Most rooms in my house are getting a little Winterlicious makeover.


The mantel is complete. 
I made the stockings yesterday, but haven't had a chance to take pictures yet.   
To see how I did the mantel go here.


To further bring in some winter sparkle,
I moved my glass bubbles from outside to in and gave them a seasonal sprucing up.


I emptied out the sand, succulents, shells, and tillandsias and hung them on the curly willow branches next to my vertical pallet garden and my metal hanging basket light.  So far the experimental vertical garden is doing awesome and it's growing.  I added some Christmas balls to the light for some Holiday bling.


I filled the glass balls with faux snow, faux greenery, and a Christmas ornament. 
Gold birds, a snowman, and a Christmas tree. This was a free makeover, I used what I had.


The bubbles make me feel like it's winter here in San Diego, 
Sometimes it even looks like it's snowing inside.
Stay warm birdie.


I don't really use too many snowmen in my Christmas decor, but I like him contained in the bubble.

I tend to put things in glass containers and change them out for the season.
Here's one of my giant Winterlicious snow globes. 
To see more of my snow globes go here.


These glass containers sit on my kitchen counter.


More glass on my island. 
We don't get much snow in San Diego so I have to pretend with my vignettes. 
The glass contains the snow so we don't end up with "snow drifts" all over the house.


Still need to work on my picture taking and getting rid of the glare off the glass. 


Hope your Holidays are warm and cozy even though it's snowing at my house.


Michaela Noelle

Thursday, July 14, 2011

Cami's Room Evolution

If you have been following along with Cami's room makeover, Cami has been back in her new room for a while and it's livable but not totally finished.  I'm still working on some art projects, a window treatment, and some crown molding. 
Cami is eleven and going into sixth grade.  She is very confident and knows what she likes and dislikes.  She requested turquoise blue walls, horses, good lighting for reading, a comfy chair, storage for all her books and stuff, and a desk for homework and drawing.  I tried to give her everything she asked for on a shoe string budget.


I thought I'd show you how the room looked when we first moved in. 
Here is the WAY before.
Casey and Cami used to share this room and I painted it like this when they were little. 
They had bunk beds.  You can see them in the back left hand corner of the picture. 
The girls are 4 and one 1 1/2 in this picture. 


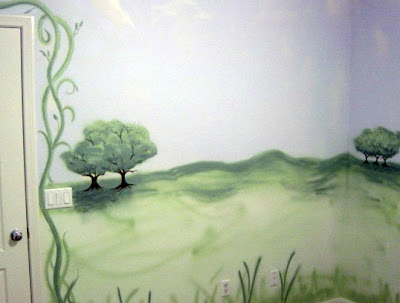
I used a cheap paint sprayer to whip this paint job out in about an hour.  The tapping off of everything I didn't want paint on took several hours, but the actual paint job was really quick (the paint sprayer was so cheap it died shortly after completing this project).   
The detail of the vines, tree trunks, shading, and grass were done with a regular spray paint can in two different greens.  I added the tree branch detail with a small paint brush.

Using the spray paint can went much faster then painting by hand.
 I wanted the room to have a kid like "cartoon" feel.  The clouds are done with white spray paint right out of the can. 
The sky on the walls fades from a blue to lavender.  This was achieved by changing the paint color to lavender and not cleaning the sprayer.  The sky color gradually changes as you move further up the wall.   The clouds are the absence of lavender paint.  The base of the cloud is the builder white ceiling.  The cloud detail was added with white spray paint out of a can.  Sorry the pictures are bad.

  
I used the same lavender blue to spray the bathroom as well.  I used wavy lines to mimic the feeling of being under the sea. 
The difference is I hand painted the sea life.  To see more of the bathroom go here.


The other bedroom was bigger (we only have three) so I moved the girls into the bigger room and took this one over as the office and painted it a beigy tan.
When the girls got their own room Cami moved back into this one "as is." 
I took the bunk beds apart and now they each have one.

Cami thought her current room was too "babyish."  Unfortunately the second child always grows up faster then the first.  This was the armoire I had from the time Casey was born.  Perfect for baby clothes, not preteen clothes.  I sold it on Craig's List.  I was sad to part with it.


You can see her new dresser in this picture.  I found it on Craig's List and updated it for her.  The mirror is still where it was when the armoire was in the room.  The bed was situated on the longest wall in the room. We kept the bed for now, but replaced the bedding and the drapes.  I changed out the  mirror.  We kept the shelves.  The bedside lamp went bye bye.


The room has two doors, this is the door to the bathroom and one small window that looks out to the drive way.  The view isn't nice so we keep the blinds shut.  The room tends to be dark.


It has one whole wall of closets.  I should be happy with all the closet space, but it really limits our bed placement options.

Here is the opposite wall from the current bed placement.  Cami had one small narrow bookshelf that was completely packed.  She needed more storage and needed to do some editing.  Her desk was unusable because it was covered in stuff.  The drape in front of the desk was hiding more stuff underneath.
 The bookshelf will be used in another room.  The desk will be repainted.  The bulletin boards, shelves, and Ikea desk chair will all be reused in this room.


Here is the door to the hallway.  Cami picked out the paint colors she liked and she lived with the swatches for a few days before she made her final decision.


Things that went bye bye. 
The broken ugly ceiling fan.


The dated carpet with runs and stains.

Math isn't one of my strong suits, but this is how my design equation equals out.
 Desire for Change + Teeny Tiny Budget = Creative Solutions

Here's a re-cap of what has been completed on my teeny tiny budget.

I found a dresser on Craig's List and painted it.


I painted the walls
Benjamin Moore Poolside Blue


I found a bamboo chair  on Craig's List and painted and recovered it in fabric I already had.


I pulled out the carpet and painted the concrete floors


I made a chandelier with an old lamp from H4H and two hanging planter baskets from Lowe's.


I bought and installed Billy Bookshelves from Ikea. 
The biggest expense in the room.  They are placed on the wall where the bed used to be.


I painted the black desk blue and white and placed it in between the bookcases.


I have never been a fan of fake wood furniture that comes in a box, but these work and fit the room's needs perfectly.  You can't beat the price. 

OK, so maybe I'm a fan now and I will get off my high wooden horse.

I found a new mirror at Home Goods.
On Clearance
 It had a few nicks that I touched up with white paint. 
No more boo boos.


I gave some new life with spray paint to some old lamps I already had. 


I re purposed some old toys to make wall art.


I used found driftwood and added some plastic horses to make a jewelry organizer.


I'll show you the final reveal in a later post.

Thanks for checking it out and following along with the makeover.


Saturday, July 9, 2011

Thanks For The Love!

My little blog has been getting a little TLC.

Mandi over at Vintage Revivals
borrowed my hanging planter chandelier idea to come up with this spectacular chandelier of her own.  I'm impressed!  Go check out this Epic Room Revival
She is AMAZING and I'm honored to be mentioned in her post.

ERM 4 135

Here are my metal hanging basket chandeliers in case you missed them.

The first try was made with left over stuff I already had. 
To see the step by step instructions go here.


Then I made this one for Cami's room.
To see how I did it go here.


Over at the CSI Project Outdoor Spaces Challenge 
my Outdoor Dining Room made
the Top Ten! 

Thank you Linda from Craftaholics Anonymous for picking my outdoor space as one of her favorites.


Thanks for the love!


Saturday, July 2, 2011

Goodbye Old Living Room, Hello New Office

Thank you friends for all your condolences about Roscoe.  We are off to New York to visit my husband's family and the timing is a blessing.  The hardest time for our family is when we are at home.  Roscoe was always in the middle of all of our activities and now she isn't around. 
The change of scenery will do the family good.

So while we are gone I wanted to show you how I changed up our living room to make it into a more usuable space.   

Do you have a room designated as an office in your home? 
This has been the dilemma in our house since I let my daughter's have their own room.  Our home has three bedrooms.  When we split the girls up we lost the office/ TV room.  Since then the computer has been in my older daughter Casey's bedroom.  We turned the closet into a computer desk.  This hasn't been a great situation.  I wake her up if I'm on the computer really early in the morning or late at night.  If she needs to do homework and I need to work on the computer she has to move to her bed.


Here is the solution.  We made the living room into the office.  Not the best situation, but you got to work with what you have and  we rarely use this room.  Last Thanksgiving I coverted the living room into a dining room for the day.  We don't have a formal dining room either.  We were hosting dinner for our family and the weather wasn't cooperate for an outdoor event.   To see more Thanksgiving pictures go here.


On a day to day basis this room mostly functions as a passage way.  Going in and out of the front door and to get to the kid's bedrooms, but not much else.
 This is what it looked like before.  Brown, brown, and more brown.  I'm slowly getting rid of it.  There's Roscoe in the bottom right hand corner directing the photo session.  She always liked to help with whatever project I was into at the moment.


Here is how it's set up now.


  The concrete floors will stay this color, but everything else is slowely getting a face lift.


Most recently it looked like this while I was redoing Cami's room. 
Scary!


I just painted this table white.  It was brown and it matched the wood detail on the couch.  Next to get a makeover are the mirrors on the wall behind the couch.  I want to slip cover the couch too when I get the sewing bug again. 


I painted and made the pillow a few years ago.  It's just acrylic paint on duck cloth.


I added two wicker chairs across from the couch.  I found them on Craig's List for $20 for the pair.


 I pull them out the front door when we entertain in our outdoor room.


This is the view when you walk in the front door.


More shells, faux coral, and an orchid.


I moved the desk from my family room to this room and placed in front of the window.


It's difficult to photograph this room during the day because of the South facing windows.  I love looking out into the garden and seeing the humming birds visiting my flowers, but it doesn't make for good photos.


The only other new bought piece in the room is the new swagged light over the desk.  I purchased it for $20.  Sorry I didn't take a before picture.  I thought I did, but I can't find them?  It's another Restore find.  It had dated seventies etched glass panes covering each side of the fixture. 


I removed the glass and spray painted the light gold.


It needed some dimension so I gold leafed the whole thing. 
I'm a messy leafer.


I added some beads and faux pearls to each hole left from removing the glass.


Me trying to be artsy.


It's on a dimmer but again I'm not a great photographer.  Here's the desk before my husband helped me move the computer.  I lived with it like this for a while to make sure I would like it before taking the time and effort to move the computer out to this room.


Here you can see where I attached the beading wire into the holes left from removing the dated etched glass.


While having the computer in my living room isn't ideal, it's working out great so far.  Because the computer desk is dark and the computer is black they kind of blend into one another.  Your eyes are drawn to the white round table in the middle of the room first.  At least that's what I tell myself.

Where is your computer?  Do you have a gorgeous office to work in?  Or are you like me, gratefully making due with the space you have.

I would love to hear about it.

Thanks for checking it out.


Related Posts Plugin for WordPress, Blogger...