Showing posts with label paint. Show all posts

Thursday, April 5, 2012

Henry's Room Update

Here's where the man cave is at right now. 
If you missed the evolution of this room go here.


I moved as much of the furniture out as possible.


I borrowed my parents extension ladder for the high alcove above the front door.  It's a little precarious painting the space.  It's hard to paint and make sure I don't fall off the ladder. 
Been there, done that, don't need to do it ever again. 
I try to only go up on this ladder when someone is home to call 911 if I happen to fall off. 
No seriously, I'm not kidding. 


Before new paint.
Yes, I know the light is yucky.  It's the one that came with the house and the last to get changed out.


After


I finished most of the window casings yesterday.
Next step crown molding.
I'm calling in reinforcements for that step. 
This room has some difficult angles that I need my Dad and brother to help me with.

On the immediate to do list:

*Finish molding and paint.
*Get a quote from an electrician to add a junction box to the center of the ceiling.
*Replace the white blinds with woven wood shades.
*Narrow down furniture selections and take Henry to try them out for his final choices.

My house is a total disaster and we are having Easter here on Sunday. 
 It's just my family so hopefully they will understand.

Thanks for checking it out.


Friday, December 16, 2011

Tis The Season For Painting Mirrors

I started painting my mirrors and windows last year and I'm doing it again for this Christmas. 
 It's an EASY, quick, and affordable way to bring in the Holiday cheer.


No artistic talent necessary, you just need some stencils, bought or homemade. 
This is the mirror outside in our front yard courtyard. 

 
This is what the mirror looks like the rest of the year.


It's an old mirror that I hot glued floral foam and moss to.  Then I wrapped chicken wire on top of it and stapled it to the wooden frame.  I grow Tillandsias on it because they don't require much water.


I made some homemade stencils out of computer paper for my template.  This is a one use stencil project.  Use stencil Mylar for repeated use.  I found the pictures on the Internet and I traced the picture of the deer right off my monitor because my printer is out of ink.


I used white and a little gray acrylic craft paint to block in the stencils.  I stuck in some pine cones around the moss frame and added some sticks to the front sides of the mirror to make it 3D. 


 I drug home the sticks from one of my walks.  The gardeners missed picking these up after trimming the trees. 
I still have leftovers for another project.


I freehand painted the mountains in the background, but it looked good without them too.  I shaded the bottom of the deer's belly and legs with a little gray paint to help define his body in the white snow.  Save the inside of the deer cutout and overlay it on top of the painted deer image to add the shading once the deer is dry. 


Here are some more stencil and paint mirror projects I did inside the house. 
The paint is easy to clean off the mirror after the Holidays.

Our family initial and snowflakes.


Last year I used these cardboard letters and faux snow to decorate the outside windows.


I used the same stencils this year for some indoor mirrors, but substituted the snow for acrylic paint.


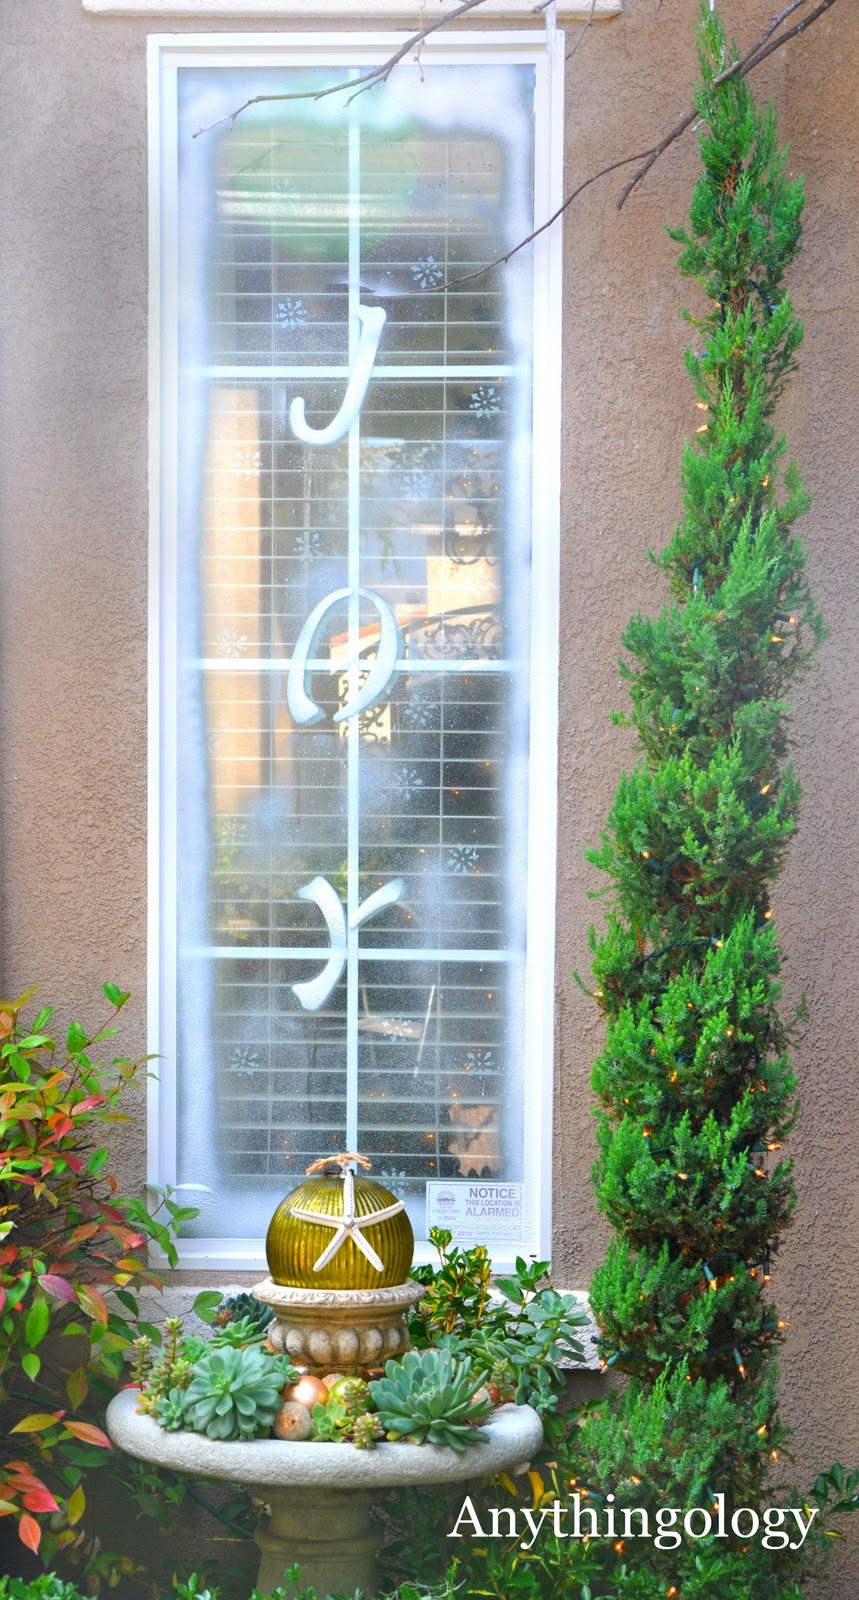
It's snowing JOY

 
 Here are the outside windows for this year using the cardboard stencils and faux spray snow. 
These are EASY!


Wishing you and your family Hope, Peace, and Love this Christmas.

Thanks for checking it out.


Thursday, August 18, 2011

How Do You Decorate a Wall Niche?

Do you have a recessed wall niche in your home?  How did you decorate it? 
This was the dilemma we had when we purchased our tract home ten years ago.   
Here is how I decorated our two niches.

The first one is over my fireplace. I painted this urn with hydrangeas many years ago. I have plans to redo it because I love change and I'm getting tired of it.


It took me about three weeks to paint this because at the time my girls were one and a half and four years old.  I had very limited painting time back then.

Here is the other niche we have in the rotunda between our great room and our master bedroom. 
It's been decorated this way for a few years.


I painted the rotunda black and left the border wall of the niche and the ceiling white.  I added upholstery tacks to the edge of the niche and around the recessed area on the ceiling.  It cost me about $25 for a box of 1000 tacks.  I use them everywhere like my powder room and still have leftovers from the original box.

To see more upholstery tack ideas go here

For this niche I added a mirror and hung a sconce on it.  I love how the candle light reflects in the mirror.  I found the mirror at Marshall's and re painted it a silver gold.


After hanging the mirror,  I used a glass and tile bit to drill a hole through the center of the mirror (WEAR EYE PROTECTION and GLOVES).  I carefully placed a nail through the drilled hole and hammered it into the wall behind the mirror.  You might need to add a molly to secure the nail into the wall if it's not hammered into the wall stud.   There is a chance you can shatter the mirror when you drill it or hammer the nail through the mirror.  Be careful and wear gloves and eye protection.  I used to make table top fountains and frequently drilled glass and ceramic containers.  Sometimes the hot drill bit will shatter your project.  This was a inexpensive mirror from Marshall's, so I was willing to take the chance of it breaking. 


 I used some earthquake tack stuff (not sure of the real name) to secure and cushion the back of the sconce on the mirror. It looks like chewing gum and I think I bought it Home Depot?  This keeps the sconce from scratching the mirror and from sliding around.


The sconce was brown and I painted it the same silver gold color as the mirror. 
I think I bought at Marshall's for under $10?
I added some of my magnetic crystal drops to the sconce for a little more bling.  To see how to make them go here.


The candle gives off beautiful light at night.

The upholstery tacks catch the shimmer and look like mini pin points of light.


Here are some other pictures of interesting ways to decorate niches. 
There are so many creative ideas out there!

Paint a meaningful quote.


Personalize with family photographs.


Paint an interesting pattern.
I love this!


Frame out the niche and paint the recessed area a different color.
I'll take one of everything.


Add shutters.


Add shelves.


Add drama with lighting.


Add art.


Tile it.


Do you have a niche? 
I'd love to see how you decorated it!

Thanks for checking it out.


Wednesday, May 25, 2011

Sophisticated Decor For A Horse Loving Girl

Cami's room makeover is in full swing.  The walls are painted and the concrete floors are done. I haven't moved her back in yet because I need the give the floor some time to cure. 


She has been sleeping in the living room for the past 3 weeks. Not ideal, but we don't have a guest room for her to sleep in so there wasn't another option. The makeover has oozed all over the rest of the house, but it's almost done.


While waiting for the floor to cure, I've been working on some other projects for the room.  Cami has requested a horse theme.  I thought about painting a mural, but she's a pre-teen and I'm not sure she would out grow it by next year?    Here is my solution.  I found this add in one of my magazines.  I liked the bold color and the crisp white together.  No plaid, no over the top horse decor, just classic with a modern update.  Check out the painted herringbone floor, love!


I painted the room Benjamin Moore Poolside Blue.  I found a bamboo chair on Craigs List and re-did it for her room.  I also found a dresser and painted it. 


Here is my latest project.
My incredibly stylish friend Wendy over at Simply Brookes posted about white lacquer antlers .  Here is a picture she took at Z Gallery from her blog . 

See the white horse head?
This is the direction I'm going.


I have had these Breyer Horses since I was a kid.  My mom saved them and gave them to my my girls years ago when they were little.  They have been well "loved" and played with a ton.  My girls have grown out of them and don't play with them much these days.  They're in a box stored under the bed. 
Being a saver (hoarder) has it's advantages.


I started with horses I already had (free is good) and purchased 1" Flush Mount Hangers and a can of Heirloom White spray paint.


I mounted the brackets (prongs facing down) on the back of the five horses (just screwed them into the plastic horse, sorry horsey) and spray painted them white.


I mounted the matching bracket on the wall (prongs facing up).
These will be over Cami's bed.
Make sure if you hang things above a bed that they are very secure.
We live in San Diego, earthquake country.


  My first idea was to cut the horse down the mid-line and then mount it to the wall, but this way is an easier solution.  Here is the first horse mounted on the wall. I like the three dimensional look and the shadow the horse creates on the wall.


The flush mounts make it very easy to attach. 
The horse side of the bracket just slides onto the wall side of the bracket.


Me Like!


More importantly,
Cami likes it!
(It's her room, not mine)


Here is a mirror I found on clearance at Home Goods
(Me trying to be the artsy photographer)


I still have more to do, but it's coming along.
Giddy Up!

Thanks for checking it out.


The DIY Show Off


beforeAndAfterButton


Related Posts Plugin for WordPress, Blogger...