Showing posts with label kid's rooms. Show all posts

Thursday, July 14, 2011

Cami's Room Evolution

If you have been following along with Cami's room makeover, Cami has been back in her new room for a while and it's livable but not totally finished.  I'm still working on some art projects, a window treatment, and some crown molding. 
Cami is eleven and going into sixth grade.  She is very confident and knows what she likes and dislikes.  She requested turquoise blue walls, horses, good lighting for reading, a comfy chair, storage for all her books and stuff, and a desk for homework and drawing.  I tried to give her everything she asked for on a shoe string budget.


I thought I'd show you how the room looked when we first moved in. 
Here is the WAY before.
Casey and Cami used to share this room and I painted it like this when they were little. 
They had bunk beds.  You can see them in the back left hand corner of the picture. 
The girls are 4 and one 1 1/2 in this picture. 


I used a cheap paint sprayer to whip this paint job out in about an hour.  The tapping off of everything I didn't want paint on took several hours, but the actual paint job was really quick (the paint sprayer was so cheap it died shortly after completing this project).   
The detail of the vines, tree trunks, shading, and grass were done with a regular spray paint can in two different greens.  I added the tree branch detail with a small paint brush.
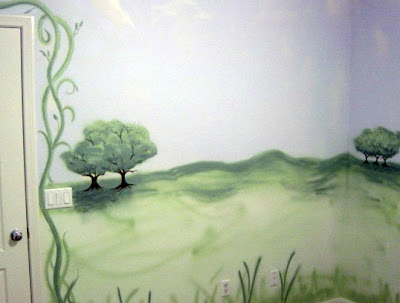
Using the spray paint can went much faster then painting by hand.
 I wanted the room to have a kid like "cartoon" feel.  The clouds are done with white spray paint right out of the can. 
The sky on the walls fades from a blue to lavender.  This was achieved by changing the paint color to lavender and not cleaning the sprayer.  The sky color gradually changes as you move further up the wall.   The clouds are the absence of lavender paint.  The base of the cloud is the builder white ceiling.  The cloud detail was added with white spray paint out of a can.  Sorry the pictures are bad.

  
I used the same lavender blue to spray the bathroom as well.  I used wavy lines to mimic the feeling of being under the sea. 
The difference is I hand painted the sea life.  To see more of the bathroom go here.


The other bedroom was bigger (we only have three) so I moved the girls into the bigger room and took this one over as the office and painted it a beigy tan.
When the girls got their own room Cami moved back into this one "as is." 
I took the bunk beds apart and now they each have one.

Cami thought her current room was too "babyish."  Unfortunately the second child always grows up faster then the first.  This was the armoire I had from the time Casey was born.  Perfect for baby clothes, not preteen clothes.  I sold it on Craig's List.  I was sad to part with it.


You can see her new dresser in this picture.  I found it on Craig's List and updated it for her.  The mirror is still where it was when the armoire was in the room.  The bed was situated on the longest wall in the room. We kept the bed for now, but replaced the bedding and the drapes.  I changed out the  mirror.  We kept the shelves.  The bedside lamp went bye bye.


The room has two doors, this is the door to the bathroom and one small window that looks out to the drive way.  The view isn't nice so we keep the blinds shut.  The room tends to be dark.


It has one whole wall of closets.  I should be happy with all the closet space, but it really limits our bed placement options.

Here is the opposite wall from the current bed placement.  Cami had one small narrow bookshelf that was completely packed.  She needed more storage and needed to do some editing.  Her desk was unusable because it was covered in stuff.  The drape in front of the desk was hiding more stuff underneath.
 The bookshelf will be used in another room.  The desk will be repainted.  The bulletin boards, shelves, and Ikea desk chair will all be reused in this room.


Here is the door to the hallway.  Cami picked out the paint colors she liked and she lived with the swatches for a few days before she made her final decision.


Things that went bye bye. 
The broken ugly ceiling fan.


The dated carpet with runs and stains.

Math isn't one of my strong suits, but this is how my design equation equals out.
 Desire for Change + Teeny Tiny Budget = Creative Solutions

Here's a re-cap of what has been completed on my teeny tiny budget.

I found a dresser on Craig's List and painted it.


I painted the walls
Benjamin Moore Poolside Blue


I found a bamboo chair  on Craig's List and painted and recovered it in fabric I already had.


I pulled out the carpet and painted the concrete floors


I made a chandelier with an old lamp from H4H and two hanging planter baskets from Lowe's.


I bought and installed Billy Bookshelves from Ikea. 
The biggest expense in the room.  They are placed on the wall where the bed used to be.


I painted the black desk blue and white and placed it in between the bookcases.


I have never been a fan of fake wood furniture that comes in a box, but these work and fit the room's needs perfectly.  You can't beat the price. 

OK, so maybe I'm a fan now and I will get off my high wooden horse.

I found a new mirror at Home Goods.
On Clearance
 It had a few nicks that I touched up with white paint. 
No more boo boos.


I gave some new life with spray paint to some old lamps I already had. 


I re purposed some old toys to make wall art.


I used found driftwood and added some plastic horses to make a jewelry organizer.


I'll show you the final reveal in a later post.

Thanks for checking it out and following along with the makeover.


Thursday, June 9, 2011

Found Driftwood Turned Into Jewelry Organizer

While working on Cami's room makeover I came up with a fun way to organize her jewelry.


A couple times a week I meet up with a foursome of my girlfriends for our weekly beach volleyball workout.  I found this cool piece of driftwood at the beach near our court.  Actually my friend Cheri found it and didn't want it, so I took it home.  One of the benefits of high tide is you never know what the surf will bring in?  The bad news is we have to clean the seaweed off our court before we can play.  It's all part of the workout. 
I cleaned this really well and left it out in the sun to dry.  I didn't want any possibility of bringing a smelly(dead) minuscule sea creature into the house.


I wasn't sure what I was going to do with it at the time, but I was in the middle of Cami's room makeover so I had horses on my brain.  So far for the room I have found a bamboo chair, a dresser, I painted, refinished the concrete floors, made a light fixture, and added some horse wall art.


I thought the driftwood might look cool as a wall hanging? 
 Maybe with hooks on it for Cami's purses, or scarves, or jewelry? 
I can't tell you how many times I have had to untie knots out of jewelry chains for my girls.  Hooks seemed to predictable so I came up with another idea.

Plastic horses for my horse loving girl. 
 I found the horses in a package at a toy store.

I started by spray painting them white.


I wasn't sure at the time if this would hang horizontally or vertically?  It works both ways.  I drilled screws into the back of the driftwood so they extended through the front about a half inch.  Stagger the screws so the jewelry won't over lap the one hanging below it.

Here is the back of the driftwood. 


Then I drilled a small hole into the back of the plastic horses about half way in and twisted them onto the screw poking through the front. 
Shish Kabob Horse.
(sorry horsies)

At this point I thought it was done? 
I loved how it turned out, but it was a little too rustic for Cami's room. 
The little white horses were hard to see on the driftwood.


Trial and error is a big part of my DIY projects.  I took it apart and spray painted the wood white and the horses bright orange.  I added a picture hanger to the back.

I like the texture and the functionality it brings into the room, plus it was almost free. 

Now Cami has a unique jewelry organizer.


No more knotted chains for me to untangle and she loves the horses.


If I had boys I would use trucks or dinosaurs.

Thanks for checking it out.


The DIY Show Off

beforeAndAfterButton


Sister Sunday Link Party


Nifty Thrifty Link Party

Monday, May 30, 2011

More Concrete Floors

Cami's is finally back in her room and I wanted to show you her concrete floors. I showed the step by step process of how to rip out the carpet and paint concrete floors in this earlier post and in this post about my family room floors.


I was inspired by this Natalie's Beach House in the City blog post about stripes.  If you haven't checked out her blog yet you are in for a treat.  Her house is gorgeous and she and her husband are not afraid to tackle big DIY projects.

Cami's carpet looked like this.  It was ten years old.
YUCK!
It was stained and spotted.

It had runs and pulls that just got bigger.


The floor prep work (the hard part) consisted of ripping out the old carpet, grinding the floor with a concrete grinder to remove the carpet glue, dry wall texture, paint, and Sharpie marker that the builder had hid under the carpet. Next came the tedious task of cleaning up the concrete dust.  I taped off all the doors to the room and it still managed to escape into the rest of the house. 
The painting part is easy.  I used the same Benjamin Moore Porch and Floor Paint as my family room and living room floors.  I had the paint store mix the color to match the trim in the room.  It's a Frazee color, White Shadow.  I tried to use the same color as the family room, but it looked yellow next to the intensity of the blue?  Three coats of White Shadow later and It was ready for some stripes.


The stripes go in the same direction as the grout line of the tile floor outside Cami's room.
I painted the stripes on the diagonal to make the small room look bigger. 
 I used my favorite painter's tape, Frog Tape.


The stripes are 18" wide and 36" apart.  They continue all the way into the closet.
I mixed the White Shadow base with some paint tints.  It's kind of a beige gray.  It will go with any color when Cami gets tired of the blue walls and wants a change.


Two coats for the stripes and almost done.


Clean up the tape and time for the sealer.


Three coats of polyurethane and then it needed time to cure.
 It's dry to the touch in a couple of hours but not move in ready.


In the mean time I installed some Billy Bookcases from Ikea.  I walked around in my socks and had my husband help me lift the bookcases into place after I finished building them so the floor wouldn't get scratched. I secured the bookcases to the wall with brackets for safety and hung Cami's bulletin board on the wall between the bookcases.
I painted an old black table white and it will fit perfectly in the center of this unit to create a work space for homework and art projects.

Can you see the bottom of the new light fixture in this picture below?  I'll show you the light in a later post.


Next I added some horse wall art to the opposite wall. 
To see that project go here.


Thanks for checking it out!


Remodelaholic
I'm linking this the Remodelaholic.
Related Posts Plugin for WordPress, Blogger...