Wednesday, March 9, 2011

Happy Pants

I always hear designers talk about how your house should reflect "who you are." Well I'm not really doing that judging by my wardrobe choices? My house is mostly neutrals, soft grays, greens, beige, black, pale blues, and browns. It's a very calm and soothing pallet. I like it that way. It makes me slow down and breathe if that's possible for a house to do? My wardrobe is anything but neutral. OK, I still LOVE to wear a lot of black, white, and gray,
but I also wear bold, graphic prints, and vivid color.


My house looks like this.


A small sample of my wardrobe looks like this.


My home decor and my wardrobe are at opposite ends of the design spectrum? I got to thinking about how this happened? Does my home reflect who I really am or does my wardrobe tell the real story? Did I design my house in neutrals so it wouldn't clash with whatever bold pattern or color I'm wearing that day?
Hmmm?


Here's what I'm talking about. I call these my "Happy Pants" because it's impossible to feel down when I put a pair of these on. First of all, they are incredibly comfortable. They feel like you have sweat pants on only I seem to walk a little taller and little peppier when I'm wearing them.
Here's what I currently have in my closet (this isn't my closet, I hung them up outside to take the picture). Notice there are two black and white prints in this batch. I can't get away from black and white. I also have velvet and velour pants (not pictured) that I wear when it's cold out. They aren't quite as colorful, but still super yummy and comfy.


I used to make them and sell them when I played in beach volleyball tournaments. I'm tall and I've spent the better part of my life not being able to find pants that were long enough. I can't count how many pieces of clothing I've ruined by accidentally throwing them in the dryer and shrinking them too short. I play volleyball with friends that are taller than me, some over six feet with the same problem.


Solution....make my own pants.


I wear my Happy Pants to work out, to go to soccer games, to slip on after I play volleyball, to run errands, to coach in, to lounge in, pretty much anywhere. I have to warn you. You can't be shy if you wear bold color like this. Strangers do a double take (my friends are used to me) because these pants stand out in a sea of blue jeans and mostly neutral fashion.

Was that a Humming Bird that just dive bombed me?

Hey up there. I want in on the photo shoot, pick me up.


Roscoe is much more photogenic than I am. She's a diva doggy.


I rarely travel outside of California anymore, but my pant fabric choices are globally inspired, and always made with stretchy fabric.
I love Asian motifs, although I don't have any in my house. Here is a pair I added some left over fabric to make a coordinating cuff at the bottom of the pant legs. I have a pair made with the cuff fabric too (more black and white).

Paisley from Persia.


Indian flavor.


Japanese umbrellas put a smile on my face.


Graphic black and white polka dots put a spring in my step.


I typically don't wear a leash, but is this print Dalmatian inspired?


Fun Fact, Dalmatians originated in Yugoslavia.

I came up with my own pattern. Some I make with a draw string top.

Some I make with a fold over yoga style top.

I got burned out on sewing when I made my couch slipcover, ottoman covers, and pillows, but I'm getting the sewing itch to make a new batch of pants for spring and summer. Maybe I'll make some tunics too? Not to wear together. Come on I know you were wondering about that?


Does your wardrobe or your home reflect your personal style?


Thanks for checking in.


Monday, March 7, 2011

How To Make A Metal Hanging Light

I saw a hanging light similar to this one (without the postcards) in a boutique that cost about $300.

$300 for a lamp that doesn't even come with a lamp shade is crazy talk to me, but I liked it and I wanted one.

I figured I could make one for much less. I love trying to use stuff I already have.

It makes me feel like MacGyver, but I don't have a mullet.


I made this light from things I already had laying around my house.
Sometimes being a "collector"(hoarder) is a good thing.

Here's my version.


I started with one of these from Ikea and I think it was under $5? It was sitting in the garage filled with to much "crapolla."

You also need two of these metal hanging basket planters. They were sitting on my potting bench unused at the moment. I purchased them a few years back at Big Lots. I think they were around $6 or $7 each? See the clips used to connect the hanging chains to the basket? You will need these later. Take off the chains and save the the clips.
Take some stiff cardboard and trace two circles a little bigger then the hole in the bottom of the planter. I used a piece of Tupperware to make my circles. The cardboard is from the back of a pad of paper.

Trace two circles.

Cut them out and trace another circle the diameter of the head of the light fixture.

Cut out the inside circle.

You should have two of these.


At this point you can paint your circles black.
I painted them in a later step, but if I made one of these lights again I would paint them at this point.

Unscrew the black ring on the light fixture (see it laying on the table?) Take one circle and screw it on the end of the light fixture. It should be a snug fit.


Hold the light fixture and the cardboard circle up to the underside of the basket. This will become the top or your light.


Turn over the light fixture and the basket and it should look like this.


Screw on the second piece of cardboard.


Screw the ring back on over the second cardboard circle.

It should look like this. The hole in the bottom of the basket should be sandwiched in between the two pieces of cardboard. The screwed on ring and two pieces of cardboard hold the light fixture and basket together.

A cardboard basket sandwich.

At this point I spray painted the cardboard. Then I took the second basket and clipped the top and bottom baskets together. When I used just one basket my light looked incomplete and too small so I grabbed a second basket to complete the orb. I used the chain clips to connect the two baskets together.

I didn't like the the bare white cord.


I used some burlap to sew a cord cover.


I hung it over my desk in the family room from an antique pulley.


I had this bulb, so until it burns out this is what I'm using. I put it on a dimmer because a bare bulb can look a little harsh. The dimmer allows me to create a soft glow.


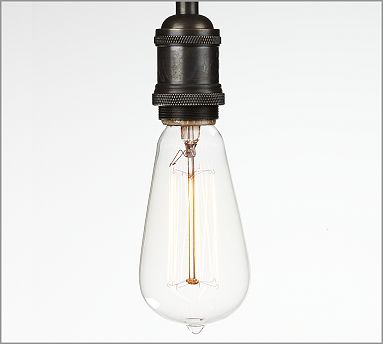
I think a filament bulb would look better. Here is one from Pottery Barn. They are $9 and not very green (energy hogs), but they look cool.

This project was free because I used stuff I already had, but even if you go out and buy the supplies to make this it would only be around $20. If I get tired of it I can reuse the baskets in the garden.


Thanks for checking it out.


Friday, March 4, 2011

Sneak Peak Of The Fireplace Mantle

The mantle is finished and it looks beautiful. I still need to do the tile surround. That is next weeks project. Here is a sneak peak.


Have A Great Weekend!
We're off to Lancaster for a soccer tournament.

Wednesday, March 2, 2011

Time Saver In The Kitchen- Beware Vampires!

I like to cook and I'm always on the look out for time savers. We eat home cooked meals six days out of the week. It's healthier and cheaper. Our kids participate in soccer and volleyball and I'm coaching volleyball, so meal time is usually after an evening practice. When I'm coaching or shuttling the kids around, I try to make dinner ahead of time or prep. dinner and my husband will complete it when he gets home from work. This is one way I've found to speed up the home cooking process.

I'm getting a little side tracked, but this is good to know. If you buy whole garlic cloves look for the ones with the dried brown stuff on top. This one is locally grown from somewhere in California, probably Gilroy. The ones with this part cut off may look prettier, but they are from China. I personally would rather buy food locally grown. I think I'm going to grow garlic this year in my veggie garden?


One clove of garlic is .50 cents a piece at our local grocery store. I still buy these for recipes that call for fresh garlic, but I also buy the big bag of garlic cloves from Costco. It's about $5 and it's already peeled. This bag is from Gilroy, California the "Garlic Capital Of The World." The big bag is very economical. The problem is it usually goes bad before I finish even half of it and we use a lot of garlic.


Now when I buy it I put it into the food processor that day.


Chop, chop, I freeze it in batches. It's ready to go and no stinky fingers.

Here is another time saver I learned from my friend Kristy. Click on her name to see her blog. She is a fabulous cook and has great recipes on it. She turned me on to these frozen herbs from Trader Joe's. They have basil, garlic, and cilantro. You can find them in the frozen veggie section. They are great when you don't have fresh on hand and they taste better than dried.

Just pop out a cube. Time to make a Trader Joe's run, I'm almost out.


Happy Cooking! How Do You Save Time In The Kitchen?

Related Posts Plugin for WordPress, Blogger...