Wednesday, September 26, 2012

Man Cave Reveal


I'm finally finished with Henry's room. 
 It's been six months since I started the man cave makeover.  
Most of the room has been done for quite awhile, I was just waiting on the couch.  
I ordered a love seat/chaise combo couch about a month ago.  
I picked up the couch a week ago, but only half of it made it home with me.

I'll tell you more details of the couch saga when we get to the reveal pictures.


The room used to look like this.


I did many DIY projects along the way of completing this room.
Just click on the hi-lighted words to see the post for more details on how I did each one.
I painted the walls
Benjamin Moore Stonington Gray HC 170 and
the ceiling Benjamin Moore Chelsea Gray HC 168.


My brother helped did the crown molding.  


I added jute rope to the existing entry light.  


I made this leather studded stump for a side table.


I added industrial wheels to this thrift store steamer trunk
I originally planned on using it as a media console, but I think the scale works better switching to the dresser.


I painted my entryway mirror a more masculine black.


Here is the finished room reveal.
I did it on a tight budget spread over several months.


The green velvet drapes and the cowhide rug are from Ikea.


The silver floor lamp is a family hand me down that I painted silver and distressed.


The media dresser has been in my family for years.
The white chair is a thrift store find that I had reupholstered years ago.


I changed out the white blinds for woven ones from Lowe's.


So, let's get back to the story of the couch.
 I searched and searched for the perfect couch for many months.
My husband and I are tall and needed a deep couch to accommodate our height.  We tend to keep our couches along time so I didn't want to skimp on quality, but it still needed to be budget friendly.


 The room is small and it's the first room you see when you walk in the front door.  Going too big would have over whelmed the space.  I found the perfect solution at a store in Solana Beach called WE-R-Fabrics.  They make custom high end furniture for very competitive prices.
I will definitely buy furniture from them again.
Now, here is where my nice little couch story gets scary.   
I picked up the couch on a Friday afternoon, but only the chaise part of the couch made the trip safe and sound to my house. 
 I watched helplessly through the rear view mirror as the love seat did a back flip out of the back of my truck on to the freeway!
I know, CRAZY!

I am very lucky to not be facing a lawsuit or dealing with the guilt of causing someones untimely death due to a couch collision on the freeway.
The lesson I learned that day is NEVER trust someone when they tell you the furniture is "secure" in the truck.
CHECK IT YOURSELF
The couch miraculously landed right side up and only received a minor tear that has been seamlessly fixed.  
More importantly, no car accidents occurred as a result of my flying couch.
I should have bought a lottery ticket that day.
 It could have been really bad, I was very lucky that no one got hurt.   
  

A week later the chaise and love seat are happy to be reunited again.
It's perfect for my tall husband and the chaise is lined up with the TV for comfortable, ideal TV viewing.


Originally I was going to make two industrial shelves like the one I made for my great room, to flank the TV, but I decide to do a gallery wall instead.


The picture on the left is of New York City where my husband is from.  It was on clearance for $30 at Homegoods.  The other map above the TV and the blue print picture to the right were also great buys from Homegoods.
I already had the two brown mirrors.


Most of the accessories I found shopping the house.
I picked up a few extra old books at thrift stores.  The globe was on clearance at Homegoods and well as the large black metal urns with the pointy finials.  


My husband is really happy with his new room.  
Now if we can just keep the girls out if it.

Thanks for checking it out.


Thrifty Decor Chick

Tuesday, September 4, 2012

Are You Ready To Get Your Halloween On?

The Halloween decor has been out in stores around here since August. 
I just got my summer decor out. 
Where has the time gone?

(This is an edited re-post from back in 2010.  It has some tried and true Halloween party and decor ideas so I'm re-posting it.)
To see my 2011 Halloween post go here.

In the past my house is decorated for Halloween by the second week of September. 
I can't help the compulsion to pull out my skulls and skeletons as soon as I start seeing the stuff in the stores. 
The last couple of years I have only put out about a third of my Halloween decorations. 
We used to have a huge Halloween party and I still have a lot of creepy decor stored away in boxes from those party days.
We always included kids at our party, so I didn't ever go over the top with scary or gory decor.

Here are some cost saving tips that have helped me get my Halloween on.

1) Use what you have in new ways. 

I added costume jewelry that I already had to Halloween skulls.


I like to embellish my skulls with costume jewelry, feather boas, and snakes.
The cloche keeps the snakes from slithering off.
Cloche and pedestal- already had
Ceramic skull- Big Lots
Rubber snake- Big Lots
Costume Jewelry- I already had from Grandma


2)   There is no reason to spend a ton of money.
Most of my decor was picked up on sale at places like Marshall's, Big Lots, the dollar store, and Target.
This candle holder is a cheap foam skull with a hole cut out in the top for a candle. I embellished it with some costume jewelry and dripped red candle wax down the sides.  The eye sockets are embellished with post earrings just pushed into the foam.  The right eye looks like it's crying jewels.
Foam skull- Big Lots

 
My pumpkins gets a dose of glam with grandma's costume jewelry, ribbon, and feathers from the dollar store.


     3)  Think multiples for a bigger impact.
   Sometimes it's better to buy 20 of the same thing than 3 of this and 2 of that.
I usually buy 2-3 crows each year to add to the flock. 
I like the impact of a hole flock of crows instead of one or two.
The flock gives visitors the evil eye when they enter the house.
They are all facing the front door. 
It gives the illusion they are all eyeballing the same thing.
 

4)  If you are having a Halloween party, think BIG.
Decor doesn't show up outside at night unless it's slightly "gaudy" by day. 

This is a picture of our bar table for our 2006 party.
The chandelier is dolled up with orange and black tulle, zebra stripe ribbon bows, and purple and orange painted light bulbs.  The ceiling is draped in more tulle and old curtains. 
Totally tacky, but it really worked at night to create a festive mood.


5) Lighting can make or break the party atmosphere.
It's one of the most important elements of a nighttime party.

Make sure you try out all your plugged in electrical lighting, your landscape lighting, and any other outdoor electrical devices that will be used on the night of the party way in advance of the real thing. Do a dry run to make sure you don't blow any fuses.
You might need to get a generator or try different outlets to avoid having a "dark" party.
Duct tape any extension cords down that go across walkways to prevent tripping.
Your guest might already be sight impaired due to elaborate costumes. 
Make sure pathways are well lit for walking, but not so bright and glaring that the creepy mood is ruined.
I used dollar store white plastic pumpkins and drilled holes all over them to create lanterns. I added paper lanterns to light this dark pathway down the side of the house.


I used battery operated candles for safety.


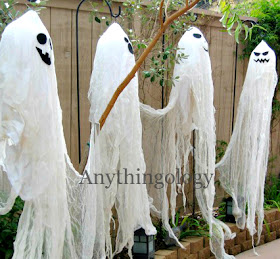
My cheese cloth ghost light up too. 
I bought inexpensive white paper lanterns and covered them in cheese cloth.
 The heads illuminate at night with battery operated tea lights.
I made the faces with glued on felt. 


   6) Embellish your existing lighting.

My chandeliers get blinged out with skeletons.
To see how to make these go here.


More magnetic skulls for a quick change to my metal hanging light.


This light fixture gets a twig, spider web, and crow makeover.
Twigs are free and spider webs are cheap.


Hanging skulls add to the creepy effect.
I picked this one up at Big Lots.


7)  Get creative with elements you can't move out of your yard for your party.

 What do you do when you've got an unattractive basketball hoop smack dab in the middle of your patio?  You make it part of the decor.  I took a metal curtain rod and duct tapped it to the top of the hoop to make the curve of the ghost head.  I slip covered the hoop in two white sheets sewn together.  I spray painted a happy face on the sheets.  The hoop is covered with ghost arms made from another sheet and stuffed with plastic grocery bags.  I set a large pumpkin on top of the basketball hoop to make it appear as if the ghost is carrying the pumpkin.   Then I hung a chandelier on the hoop for an added light source for the table below.  Sorry I don't have any good night shots, but he was the hit of  the party.  This is obviously a daytime shoot. 
Remember your guest will not see all the imperfections at night.
The basketball hoop was completely disguised at night.


    8)  Create an entrance to set the mood.
There is little doubt you are entering a Halloween themed party when you come to our front door.
One year I glued spiders on the door to spell out "Boo."
I used the wrong kind of glue because it took the paint off when I removed the spiders.
Oh well, the front door needed to be re-painted anyway.
This is not my idea, I think I saw it on Martha Stewart?


I used an inexpensive plastic skull from Big Lots and some spray painted branches to great the guest.
"Good Evening"


    9)   Don't forget the garden and landscaping.
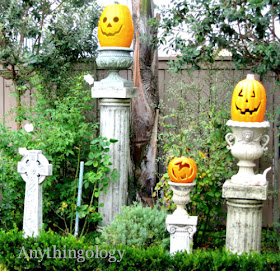
My garden becomes a graveyard. 
I re-purposed my urns and columns for a make shift graveyard. 
Again, I'm using what I already have in a new way. 
I must admit I stole this idea from the Haunted House at Disneyland.
All the pumpkins light up at night to enhance the party atmosphere.
The columns and cross are from Target when they used to have a garden center.


I covered this garden arch with purple lights and orange tulle.
Again, gaudy and tacky by day, but totally cool at night.


I painted my plastic skeletons with glow in the dark paint for a creepy nighttime effect.
This is a cheap plastic skeleton, but at night he looks great floating next to the pond.


The gargoyles always show up at Halloween.
This one is from Target.
 
 
Annuals are removed from my urns and replaced with more ghoulish landscaping.


Here is another version of the birdbath next to the front door.
Succulents and a faux white pumpkin.


The kids liked the card playing skeletons that I put in the planter next to the front door.  They are flanked by foam grave stones.
  After one of our parties, our skeleton "grew" a mustache?
I think it was a parting gift from one of our guests.


I liked the mustache and let my skeleton wear him the following year.
The Fleur De Ly's are fence toppers that I attached to more faux pumpkins.


                        10) Decorate hallways and transitional spaces.
A small hallway is a great space to add hanging elements like this caged skeleton and spider webs.
Just make sure it's high enough so tall people don't get bonked in the head walking under it.


Here is the rotunda that leads from our family room into our Master Bedroom.
Spider webs and plastic spiders give a big impact for little money.
Although my house has been painted a different color since I took this picture back in 2006, I still like the Halloween decor I used back then.


   11)  Add stick on decals to existing mirrors and pictures.
Our family photos get stick on eye ball decals.


I added a removable vinyl sticker to the mirror behind the twigs.
My skeleton looks scared.


More glued on spiders. 
These pop right off the ironstone.


 Don't forget your costume.
This is my home made version of Medusa from a few years back.
It's sad when one of the better pictures I have taken involves having snakes in my hair.
Oh well.


HAPPY HALLOWEEN!
Have you started decorating yet?
I haven't, but I'm getting excited about it.
I know yesterday was Labor Day, but it's never to early to start thinking about Halloween.

Thanks for checking it out.